There’s always socks…
Sometimes I know I need to knit (for the calming effect, for feeling “productive”, for just forcing me to put my damn phone down for a while), but I just don’t have any inspiration. I just don’t have there wherewithal to choose a pattern, to make decisions about colours, to think about what garments I would actually wear, to ensure that I get a good fit. Sometimes I have total decision fatigue, lack of executive function, whatever you want to call it – and I know that knitting is the sort of therapy that will help move me past this block – but I don’t have the ability to make a decision on what to knit.
For those kind of days – there’s always socks.
I mean, sure, you can take sock knitting seriously and put loads of thought into your style, stitch choice, colour patterns… But the beauty of sock knitting, imho, is that you don’t have to.
Sometimes I do want to follow a pattern slavishly, and appreciate the details that the designer has chosen to incorporate. I went through a big Cookie A phase – absolutely adored her book Knit. Sock. Love.

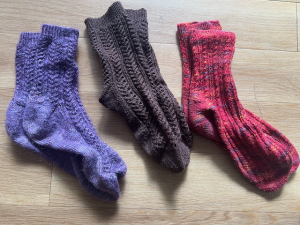
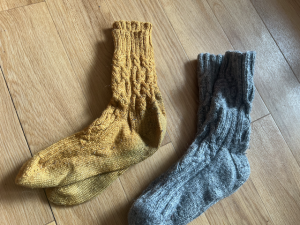
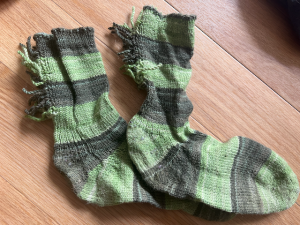
The first 5 pairs from the left are Cookie A designs. The 6th one – a neat little stretchy twisted stitch pattern from Knit Socks!. Socks 7 and 8 – I can’t remember where I got the idea for these ones – but literally start at the cuff with 2×2 rib then take the ribs for a wander – travel them where you want, cable when you feel like it, just make it up as you go along. Perfect for days when you still want to run without a pattern but you want to engage your brain just a little. Tip from me on that one – be careful about doing too many cable crosses across the arch of your foot – it takes away the stretch. Ask me how I know…That last pair – one of the crazier patterns from Cat Bordhi called Zebra with a Sweet Tomato Heel and a weird fringe down the back.
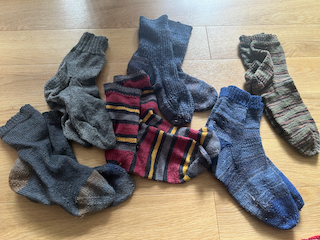
Apologies for the terrible photos and the being too lazy to smooth out the socks that had been crushed into my sock drawer. Even by my standard, that’s pretty slapdash. But when I started this blog I decided I was going to show things as they are, lowering the bar for me for sure, but also to consciously not show an instagram-perfect view of every object. I mean – I’m not trying to sell you my socks, I’m just telling you a story and sharing the pictures of my socks. And this is how my socks – straight from the sock drawer – really look.
Sometimes I just want something to knit that requires close to zero thinking. With possibly the added benefit of getting rid of some of the insane yarn stash that I always manage to build up. To use up sock yarn that was bought on a whim (a holiday purchase maybe, or possibly something only bought so I knew I would have something to do on a flight if I finished the current WIP) and has been hanging about in the house for many years, or even as an active decision to use up the leftover yarn from previous pairs of socks by doing stripes, or socks with odd coloured heels and toes. And that’s when I turn to the simplest of all sock patterns, the one that doesn’t even need a pattern. That’s what these guys all are. Something that I know will fit fine, and won’t cause me any headaches to knit. They’re my sanity.
I’ve tried all the ways to knit socks. Toe up, cuff down, sideways, knit flat. Traditional (french?) padded heel flap (or plain heel flap) with gusset, or afterthought heel, or even Cat Bordhi’s sweet tomato heel (anyone else remember that??). I’ve knitted them on DPNs, magic loop (one super-long circular), or two circulars. Two socks at a time on two circulars – because you can, and other than a little bit of yarn tangle, it’s not that difficult (and useful for making stripes that match without having to write down what you did on the first one). Once I even tried two socks at a time on DPNs (one inside the other, knitted as double knitting) – yes it’s possible, no I probably won’t ever do it again. (I’ve knitted some on the machine too – but that doesn’t give me the same psychological benefit, so I’m leaving that for a different blog.)
But when I’m tired and stressed and I’m making socks because I need to knit to feel better, this is the process I fall back on.
Once you have this formula etched in your brain, there’s literally no need for a written pattern. A pair of circular needles and a ball of sock yarn, and you can knit til you get your mental strength back.
My Basic Sock Recipe
I work with two 2.5mm circular needles, and any generic sock yarn I can find. I normally just grab a 40cm and a 60cm – but it really doesn’t matter the lengths. I prefer two different lengths – it makes it easier for me to remember where the start of the round is.
I cast on 60 stitches or sometimes 64. Used to be I always did 64 if I was doing straight stocking stitch, 60 if I was doing a “pattern” that had a little bit of give in it – a rib, or a super-simple lace. But to be honest there’s not much difference between 60 and 64 stitches at this gauge – one or more of those guys in stocking stitch was done with 60 stitches, and the ones on my needles just now which have a 2×2 rib going on were cast on with 64. Just pick a number – or a range – that works for your feet.
I cast on all stitches on the longer needle – I pretty much always do a normal long-tail cast on – and then shuffle half to the other circ. I set up in the round by switching the last stitches of each needle onto the other needle (the one that doesn’t have the yarn tail I move first, the one with the yarn tail is easier to move second because you can loosen it. I don’t knit the first stitch or 2 with yarn + tail like some people do, but you can if you want.
Once I’m set up for the round, I do a bit of ribbing – sometimes 1×1, sometimes 2×2 – for about an inch – sometimes more. Then depending on my brain power, I choose a rib, a super-simple lace pattern, or just plain stocking stitch. I knit til the sock leg is long enough for me (I try it on to see how it feels), and then I start a traditional heel flap. I don’t faff about moving stitches so my starting point (and yarn end) is exactly in the middle of anything – I just work on the longer circular needle.
I normally do the padded slip-stitch thing – knit across doing slip 1, knit 1, then turn the work, slip the first stich purlwise and purl back. I repeat this for the number of rows that I have stitches on that needle eg if I had cast on 60, I would have 30 stitches on the long needle, so I do 30 rows (15 knit, 15 purl). The it’s time to turn the heel. For me, that means I knit half the stitches plus 3 extra then turn, slip 1 purlwise purl 5, then turn, then from there i repeat the following til there’s no gaps left: on a knit row, slip 1 knitwise, knit to 1 st before the gap, SSL, knit 1 more, turn. On a purl row, slip 1 purlwise, purl to 1 st before the gap, p2tog, purl one more, turn. That should centre the decreases and all work out fine.
Once the heel is turned, the next section is the gusset. If you had done the leg of the sock in a pattern (not just stocking stitch), this is the time to make your decision on if you are carrying the pattern down the top of the foot to the toe. We never pattern the bottom of the foot – that would be uncomfortable to stand on – but it’s perfectly valid to take a pattern from the leg down the top of the foot. Or not. It’s also perfectly valid to stop the pattern at the ankle and have a plain foot. If you do decide to keep the pattern going for the top of the foot – make a mental note to yourself now that every time you knit on the other (shorter ) circular needle, you will be knitting in pattern.
Now it’s time to pick up along the heel flap for the gusset. There were 15 pairs of rows in the heel flap – so should be 15 elongated stitches (because of the slips) just waiting to be picked up. I pick up onto the longer needle. I don’t care too much about centring things again – this is what I do. Knit across the remaining heel stitches, then pick up the elongated stitches down the side of the heel (15 if I was doing a 60 stitch sock), then knit the instep stitches that are on the other needle onto the OTHER needle (or knit in pattern if you decided to continue your pattern down the top of the foot), then back to the needle with the heel stitches – pick up the 15 (or your number) stiches up the side of the heel flap, and then knit all the stitches on that needle. This first row can be a bit awkward because we’ve picked up stitches from 3 sides of a “square” – but it’ll be fine in a round or two – just stick with it. Knit across the instep stitches (in your set pattern!) on the other needle.
Now – gusset decreases start. Super-simple – we will decrease 2 stitches every second round. I prefer to do the decreases at the start and end of the heel stitch needle in the same round. I know others (DPN knitters, or perfectionists) will have started the decreases for the first side picked up before they do the ones for the 2nd side picked up – but that just messes with my head when working with 2 circular needles – I prefer to have the 2 decreases on the same circular needle on the same round, and then a plain round. Nobody will notice that the gusset decreases are staggered by 1 stitch. So – when you’re on the long needle, knit 1, look at the next stitch and if it’s not a decrease stitch then SSK it with the next stitch, knit across til 3 from the end of the needle, K2TOG, k1. If that 2nd stitch on the needle was a decrease stitch then this is your plain round – just knit that whole needle’s worth of stitches plain. On the short needle, knit in the set pattern. Keep repeating that til the number of stitches on the long needle has decreased to match the number of stitches on the short. needle (in our example, 30).
Gusset done, we’re back on the straight until the sock is long enough for the toe. Stocking stitch on the bottom of the foot, pattern if you chose to continue it, or stocking stitch, on the top of the foot. Keep going til you’re about 1.5″ short of desired length/end of your big toe. I just keep trying on the sock (the magic of knitting with 2 circs) until the sock makes it to the tip of my small toe – that works for me. Find out what works best for your foot.
I do the simplest toe too – i decrease 1 stitch each side of each needle every 2nd round until I have 10 (or 12, or 8) stitches left on each needle. 10 works best for me – but your toes might be more or less pointy than mine. If you were running a pattern down the top of the foot, I recommend you stop that now, so you are literally just doing k1, SSK, knit to 3 from the end, K2TOG, k1 on the long needle, same on the short needle, then plain on the long needle, plain on the short needle – until you get to 10 per needle. One last try on – make sure the sock will fit when you join the toe stitches together – and if all is good, break the yarn with a long tail, and graft (aka kitchener stitch) the toe together. Voila – sock number 1 is done!
Second sock – same as the first. With the added bonus that this time you have a template so you don’t need to keep taking your shoes and socks off to try your knitting on for size.
Hope this is of help to you for any time you want to knit but don’t have the brainpower to make any big decisions. Happy sock knitting!
Leave a Reply